Smart Irrigation System Using a 7-in-1 Soil Sensor
A solar-powered irrigation controller: an Arduino reads soil data from a 7-in-1 sensor, switches a water pump through a relay, and sends the readings to a phone dashboard over Wi-Fi.
- Controller
- Arduino Uno (ATmega328P) + ESP8266 Wi-Fi
- Sensor
- 7-in-1 soil sensor (RS485)
- My role
- Team member — helped build the prototype
- Report
- May 2024
Overview
A team project I contributed to as a member, helping to build the hardware prototype.
Design and implementation of a smart irrigation system using an advanced soil sensor. A single 7-in-1 probe in the soil measures moisture, temperature, electrical conductivity, pH, nitrogen, phosphorus and potassium.
An Arduino Uno reads the sensor, shows the values on an LCD and switches a 12 V water pump through a relay. An ESP8266 Wi-Fi module sends the data to a phone/web dashboard, where the pump can also be switched by hand. The system runs from a solar panel and battery.
Problem Statement
Agriculture uses a large share of fresh water, and flood or manual watering often over- or under-waters crops. The report cites that growing 1 kg of paddy needs about 2,500 litres of water, while farmers in Bangladesh use around 3,300 litres — about 800 litres wasted.
Over-irrigation also lowers the groundwater level, and under-irrigation stunts growth. Watering should follow what the soil actually needs.
Objectives
Measure key soil parameters continuously with one sensor buried in the soil.
Switch the water pump automatically based on the sensor readings.
Show the readings locally on an LCD and remotely on a dashboard in near real time.
Allow the pump to be operated manually from a smartphone or web browser.
Power the system from solar energy with battery backup.
System Architecture
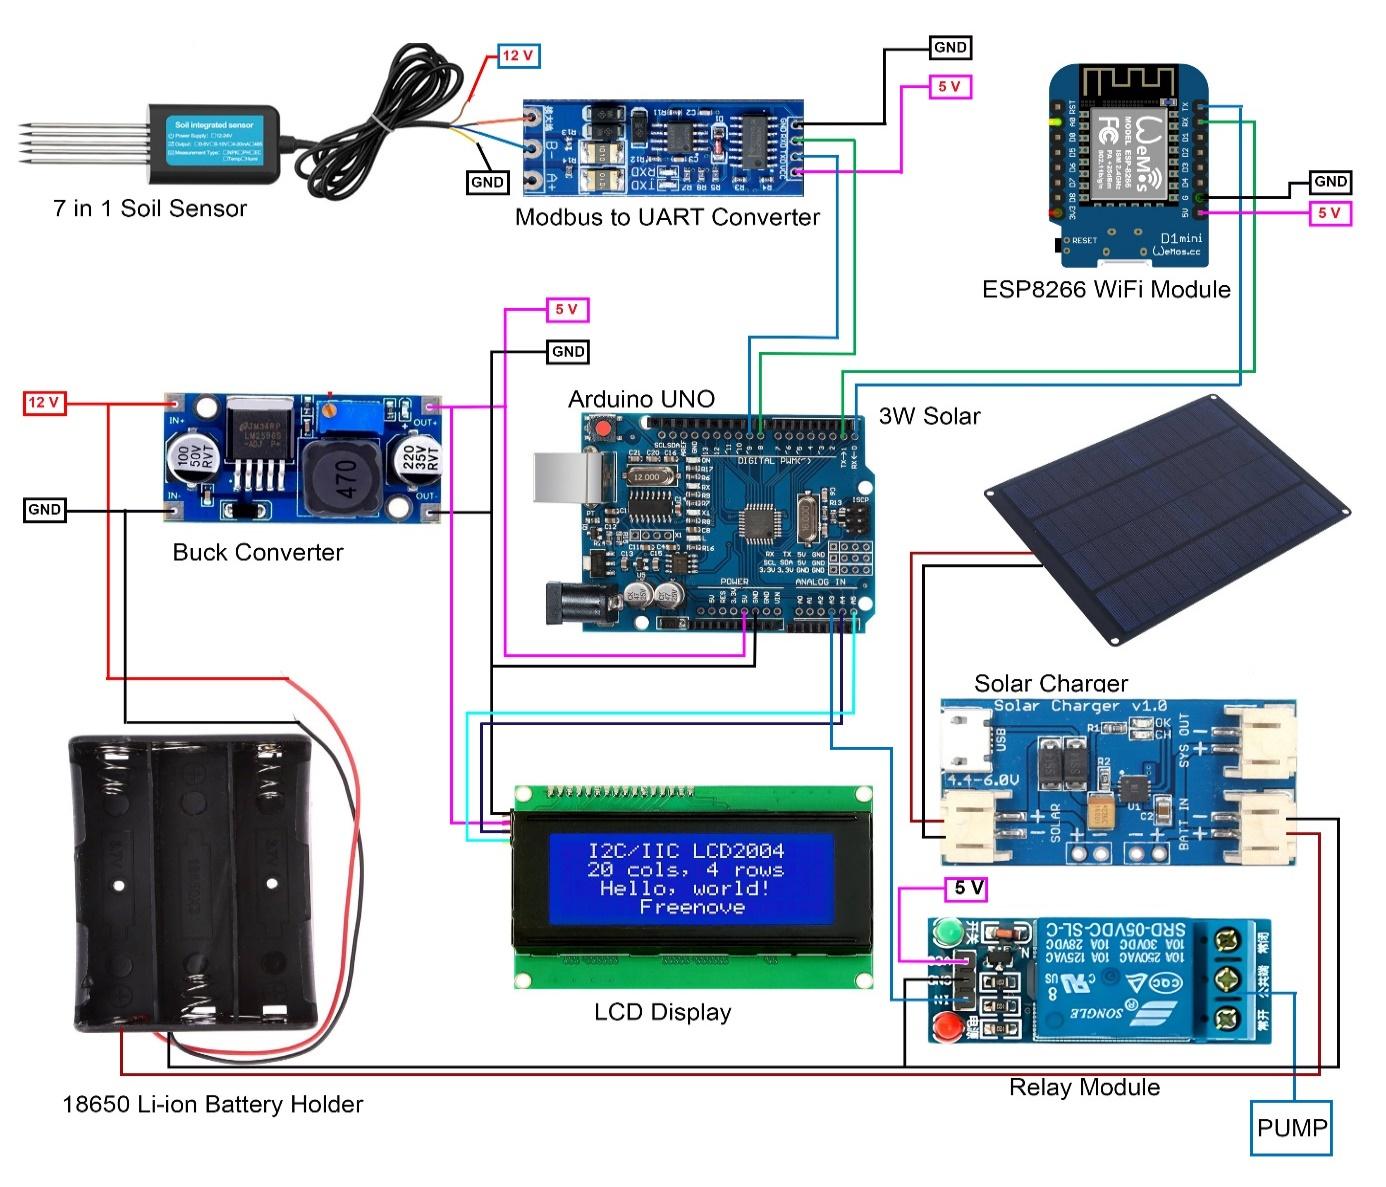
Sensing: the 7-in-1 soil sensor communicates over RS485 (Modbus). A Modbus-to-UART converter connects it to the Arduino, which sends a request frame for each parameter and reads the reply.
Control: the Arduino compares the readings with a set threshold and drives a single-channel relay that switches the submersible pump. All values are shown on a 20×4 I²C LCD.
Connectivity: the Arduino sends the readings as one comma-separated line over serial to an ESP8266 (WeMos D1 mini), which publishes them to a Blynk dashboard. Buttons on the dashboard send relay on/off commands back.
Power: a solar panel charges the battery through a solar charger module, and an LM2596 buck converter supplies 5 V to the electronics.
Hardware and Software
Hardware: Arduino Uno (ATmega328P, 16 MHz); 7-in-1 soil sensor (4.5–30 V DC, RS485 output, IP68; moisture 0–100% with ±2% accuracy in the 0–50% range, temperature −40 to 80 °C with ±0.5 °C accuracy); Modbus-to-UART converter; ESP8266 Wi-Fi module; 5 V single-channel relay (10 A contacts); 12 V mini submersible pump (130–220 mA, 80–120 L/h); 20×4 I²C LCD; LM2596 buck converter; solar panel, solar charger and Li-ion battery pack.
Software: Arduino C firmware using AltSoftSerial for the sensor link and LiquidCrystal_I2C for the display; ESP8266 firmware using the Blynk library for the dashboard. Both listings are shown below.
Power Design
Load estimate from the report: pump 10 W, microcontroller unit 5 W, sensor 3 W and solar charger 10 W — 28 W in total, or 2.33 A at 12 V.
Battery: for 8 hours of backup, (28 W × 8 h) / 12 V = 18.66 Ah, rounded up to a standard 30 Ah battery. Charging current at 10% of capacity is 3 A.
Solar panel: required current = 3 A charging + 2.33 A load = 5.33 A, so 12 V × 5.33 A ≈ 64 W. The next available size, 65 W, was selected for a full installation. The bench prototype itself uses a small solar panel and battery pack.
Methodology
1) Read each soil parameter by sending its Modbus request frame to the sensor and decoding the response bytes.
2) Show electrical conductivity, temperature, pH, moisture, N, P and K on the LCD.
3) Compare the reading with the set threshold and switch the pump relay on or off.
4) Send all values plus the pump state to the ESP8266 as one comma-separated line, every few seconds.
5) The ESP8266 updates the dashboard and passes manual relay commands from the app back to the controller.
Results
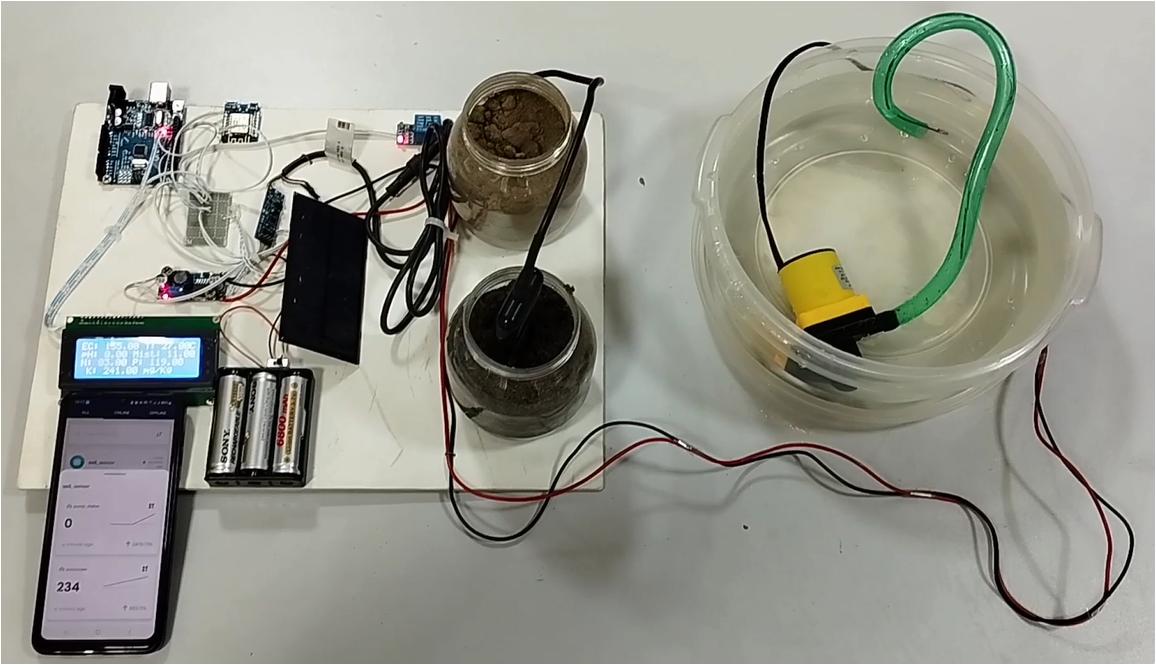
The prototype (photo below) was built and tested with soil samples in jars and the pump in a water tub. The LCD and the phone dashboard showed the live soil readings and pump state, and the pump switched according to the sensor values.
The report describes this operation qualitatively. It does not include recorded data tables or measured water savings.
Conclusion and Future Work
The system automates irrigation with few components, lets the owner monitor the field remotely, and helps avoid over- and under-watering. Its main limitation is that it was tested on a small scale only.
Proposed improvements: wireless soil sensors instead of wired ones, and electric solenoid valves for each section controlled by the Arduino or ESP8266.
Arduino firmware (C)
From the appendix of the report. Reads the seven soil values over RS485, drives the pump relay, updates the LCD and sends the data to the Wi-Fi module. In this listing the pump decision uses the potassium reading and the soil temperature is a fixed test value. The printed listing ends inside the display function.
#include <AltSoftSerial.h>
#include <Wire.h>
#include <LiquidCrystal_I2C.h>
LiquidCrystal_I2C lcd(0x27,20,4); // set the LCD address to 0x27 for a 16 chars and 2 line display
int pump_status = 0;
int pump = 12;
float humidity, tempe, phs, moistur, nitrosa, phosphorus, potass;
const byte temp[] = {0x01,0x03, 0x00, 0x13, 0x00, 0x01, 0x75, 0xCF};
const byte mois[] = {0x01,0x03,0x00,0x12,0x00,0x01,0x24,0x0F};
const byte econ[] = {0x01,0x03, 0x00, 0x15, 0x00, 0x01, 0x95, 0xCE};
const byte ph[] = {0x01,0x03, 0x00, 0x06, 0x00, 0x01, 0x64, 0x0B};
const byte nitro[] = { 0x01, 0x03, 0x00, 0x1E, 0x00, 0x01, 0xE4, 0x0C };
const byte phos[] = { 0x01, 0x03, 0x00, 0x1F, 0x00, 0x01, 0xb5, 0xCC };
const byte pota[] = { 0x01, 0x03, 0x00, 0x20, 0x00, 0x01, 0x85, 0xC0 };
byte values[11];
String msg = "";
AltSoftSerial mod;
float envhumidity = 0.0, envtemperature = 0.0, soil_ph = 0.0, soil_mois = 0.0, soil_temp = 0.0;
byte val1 = 0, val2 = 0, val3 = 0, val4 = 0,val5 = 0, val6 = 0, val7 = 0;

void setup() {
    lcd.init();
    lcd.init();
    //Welcome message
    lcd.backlight();
    lcd.setCursor(0,0);
    lcd.print("Welcome to...");
    lcd.setCursor(2,1);
    lcd.print("Smart Irrigation");
    lcd.setCursor(6,2);
    lcd.print("Project");
    lcd.setCursor(0,3);
    lcd.print("By: Mosarof Hossain");
    pinMode(pump, OUTPUT);
    //pump is off
    digitalWrite(pump, HIGH);
    Serial.begin(9600);
    mod.begin(9600);
    delay(3000);
}
void loop() {
    val1 = moisture();
    //if(val1>100) val1 = 100;
    soil_mois = val1;
    soil_temp = random(26,28);//temperature()/10.0;
    val3 = econduc();
    int conduct = val3;
    val4 = phydrogen()/10;
    soil_ph = val4; if(soil_ph>9) soil_ph = soil_ph - 5;
    val5 = nitrogen();
    int nitros = val5;
    val6 = phosphorous();
    int phosp = val6;

 val7 = potassium();
 int potas = val7;
 humidity = conduct, tempe = soil_temp, phs = soil_ph, moistur = soil_mois, nitrosa = nitros, phosphorus = phosp, potass = potas;

 if(potas<100){
  digitalWrite(pump,LOW);
  pump_status = 1;
  delay(1000);
  }
 else if(potas>100){
  digitalWrite(pump,HIGH);
  pump_status = 0;
  delay(1000);
  }
 display_soil();
 msg += soil_mois;
 msg += ",";
 msg += soil_temp;
 msg += ",";
 msg += conduct;
 msg += ",";
 msg += soil_ph;
 msg += ",";
 msg += nitros;
 msg += ",";
 msg += phosp;
 msg += ",";
 msg += potas;
 msg += ",";
 msg += pump_status;
 msg += "\n";
 Serial.print(msg);

    msg = "";
    /*
    delay(1000);
    Serial.print("Moisture: ");Serial.print(soil_mois);Serial.println(" %");
    delay(1000);
    Serial.print("Temperature: ");Serial.print(soil_temp);Serial.println(" C");
    delay(1000);
    Serial.print("EC: ");Serial.print(val3);Serial.println(" us/cm");
    delay(1000);
    Serial.print("ph: ");Serial.print(soil_ph);Serial.println(" ph");
    delay(1000);
    Serial.print("Nitrogen: "); Serial.print(val5);Serial.println(" mg/kg");
    delay(1000);
    Serial.print("Phosphorous: ");Serial.print(val6);Serial.println(" mg/kg");
    delay(1000);
    Serial.print("Potassium: ");Serial.print(val7);Serial.println(" mg/kg");
    Serial.println();
    */
    delay(5000);
}
byte moisture() {
    mod.flushInput();
    delay(1);
    for (uint8_t i = 0; i < sizeof(mois); i++) mod.write(mois[i]);
    mod.flush();
    delay(500);
    for (byte i = 0; i < 7; i++) {
        values[i] = mod.read();
    }
    return values[4];
}
byte temperature() {
    mod.flushInput();

    delay(1);
    for (uint8_t i = 0; i < sizeof(temp); i++) mod.write(temp[i]);
    mod.flush();
    delay(500);
    for (byte i = 0; i < 7; i++) {
        values[i] = mod.read();
    }
    return values[3]<<8|values[4];
}
byte econduc() {
    mod.flushInput();
    delay(1);
    for (uint8_t i = 0; i < sizeof(econ); i++) mod.write(econ[i]);
    mod.flush();
    delay(500);
    for (byte i = 0; i < 7; i++) {
        values[i] = mod.read();
    }
    return values[4];
}
byte phydrogen() {
    mod.flushInput();
    delay(1);
    for (uint8_t i = 0; i < sizeof(ph); i++) mod.write(ph[i]);
    mod.flush();
    delay(500);
    for (byte i = 0; i < 7; i++) {
        values[i] = mod.read();
    }
    return values[4];
}
byte nitrogen() {
    mod.flushInput();

    delay(1);
    for (uint8_t i = 0; i < sizeof(nitro); i++) mod.write(nitro[i]);
    mod.flush();
    delay(500);
    for (byte i = 0; i < 7; i++) {
        values[i] = mod.read();
    }
    return values[4];
}
byte phosphorous() {
    mod.flushInput();
    delay(1);
    for (uint8_t i = 0; i < sizeof(phos); i++) mod.write(phos[i]);
    mod.flush();
    delay(500);
    for (byte i = 0; i < 7; i++) {
        values[i] = mod.read();
    }
    return values[4];
}
byte potassium() {
    mod.flushInput();
    delay(1);
    for (uint8_t i = 0; i < sizeof(pota); i++) mod.write(pota[i]);
    mod.flush();
    delay(500);
    for (byte i = 0; i < 7; i++) {
        values[i] = mod.read();
    }
    return values[4];
}
void display_soil(){
    lcd.clear();

 lcd.setCursor(0,0);
 lcd.print("EC: ");
 lcd.print(humidity);
 lcd.print(" ");
 lcd.print("T: ");
 lcd.print(tempe);
 lcd.print("C");
   lcd.setCursor(0,1);
 lcd.print("pH: ");
 lcd.print(phs);
 lcd.print(" ");
 lcd.print("Mist: ");
 lcd.print(moistur);
 lcd.setCursor(0,2);
 lcd.print("N: ");
 lcd.print(nitrosa);
 lcd.print(" ");
 lcd.print("P: ");
 lcd.print(phosphorus);
 lcd.setCursor(0,3);
 lcd.print(" ");
 lcd.print("K: ");
 lcd.print(potass);
 lcd.print(" mg/Kg");
 delay(1000);
ESP8266 firmware (Blynk)
From the appendix of the report. Connects to Wi-Fi and Blynk, forwards dashboard relay buttons to the Arduino and publishes incoming values. The Wi-Fi name, password and Blynk keys have been removed.
#define BLYNK_PRINT Serial
/* Fill in information from Blynk Device Info here */
#define BLYNK_TEMPLATE_ID   "<removed>"
#define BLYNK_TEMPLATE_NAME "IoT Smart Grid"
#define BLYNK_AUTH_TOKEN    "<removed>"

#include <ESP8266WiFi.h>
#include <BlynkSimpleEsp8266.h>
// Your WiFi credentials.
// Set password to "" for open networks.
char ssid[] = "<removed>";
char pass[] = "<removed>";
String inputString = "";        // a string to hold incoming data
boolean stringComplete = false;
long timer = 0;
// This function will be called every time Slider Widget
// in Blynk app writes values to the Virtual Pin 1
BLYNK_WRITE(V1)
{
    int pinValue = param.asInt(); // assigning incoming value from pin V1 to a variable
    if(pinValue==1){
     Serial.println("relay1on\n");
     }
    else if(pinValue==0){
     Serial.println("relay1off\n");
     }
}
BLYNK_WRITE(V2)
{
    int pinValue = param.asInt(); // assigning incoming value from pin V1 to a variable
    if(pinValue==1){
     Serial.println("relay2on\n");
     }
    else if(pinValue==0){
     Serial.println("relay2off\n");
     }
}
void setup()
{

    // Debug console
    Serial.begin(115200);
    Blynk.begin(BLYNK_AUTH_TOKEN, ssid, pass);
    inputString.reserve(200);
}
void loop()
{
    Blynk.run();
    if (stringComplete) {
     int i1 = inputString.indexOf(',');
     int i2 = inputString.indexOf(',', i1+1);
     int i3 = inputString.indexOf(',', i2+1);
     int i4 = inputString.indexOf(',', i3+1);
     int i5 = inputString.indexOf(',', i4+1);
     int i6 = inputString.indexOf(',', i5+1);
     int i7 = inputString.indexOf(',', i6+1);
     String voltage = inputString.substring(0, i1);
     String current = inputString.substring(i1 + 1, i2);
     String active = inputString.substring(i2 + 1, i3);
     String frequency = inputString.substring(i3 + 1, i4);
     String pf = inputString.substring(i4 + 1, i5);
     String energy = inputString.substring(i5 + 1, i6);
     String apprant = inputString.substring(i6 + 1, i7);
     String reactive = inputString.substring(i7 + 1);
     /*
     Serial.println(voltage);
     Serial.println(current);
     Serial.println(active);
     Serial.println(frequency);
     Serial.println(pf);
     Serial.println(energy);
     Serial.println(apprant);
     Serial.println(reactive);

        */
        double volt = voltage.toDouble();
        double amp = current.toDouble();
        double watt = active.toDouble();
        double hartz = frequency.toDouble();
        double pfactor = pf.toDouble();
        //Blynk.virtualWrite(V3, volt);
        Blynk.virtualWrite(V4, amp);
        Blynk.virtualWrite(V5, watt);
        //Blynk.virtualWrite(V6, hartz);
        Blynk.virtualWrite(V7, pfactor);
        // clear the string:
        inputString = "";
        stringComplete = false;
    }

}
void serialEvent() {
    while (Serial.available()) {
        // get the new byte:
        char inChar = (char)Serial.read();
        // if the incoming character is a newline, set a flag
        // so the main loop can do something about it:
        if (inChar == '\n') {
            stringComplete = true;
        }
        else
        // add it to the inputString:
            inputString += inChar;
    }
}
Diagrams & Pictures
Pictures